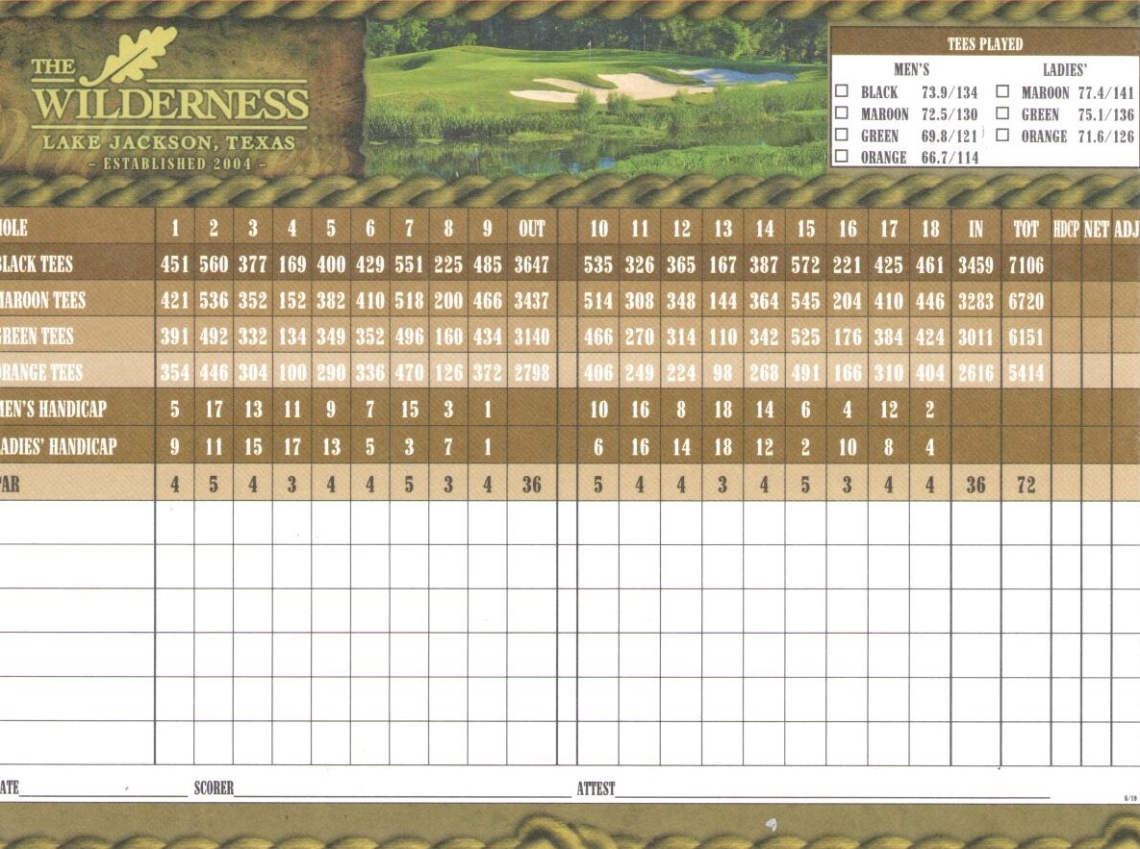
Hole No. 1 Par 4 451 / 421 / 391 / 354 Yards
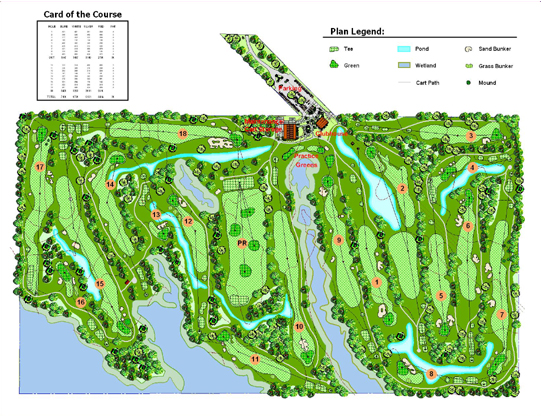
The Wilderness begins with a long par 4 that features the Championship tee box located across the lake from the main tee boxes for the really long hitters! For this par 4, a draw is preferred – but must avoid the left fairway bunker and a narrow landing area. Favoring the left fairway is best to set up a long iron approach to a large green guarded by an island bunker. The middle right pin position behind the bunker is the most difficult pin.
Hole No. 2 Par 5 560 / 536 / 492 / 446 Yards
The second longest par 5, is downwind and a potential eagle opportunity for the risk taker. After a bunkerless tee shot which encourages length to a wide landing area (but beware of the water), golfers can choose one of two routes for their second shot over the lake to the green for a birdie attempt (with a large green front apron to allow a roll onto the green) or safely to the right landing area. The small, relatively flat, raised green slopes sharply from back to front, which helps stop shots, but makes going beyond the pin treacherous. Avoid missing the green to the left.
Hole No. 3 Par 4 377 / 352 / 332 / 304 Yards
A short par 4 with a fairway guarded by huge oaks. Avoid the left side fairway. The split-level green requires you to hit an accurate approach shot to be on the same level of the green as the pin to score well.
Hole No. 4 Par 3 169 / 152 / 134 / 100 Yards
This par 3 also features a green angled left, with a large ridge through the middle. Playing close to the back left Sunday Pin requires nerve, judgment and skill due to the water that borders the green. Any golfer playing right will suffer a long putt.
Hole No. 5 Par 4 400 / 382 / 349 / 290 Yards
A mid-length par 4 featuring one of the easier tee shots on the course with a bunker-free and generous landing area. Pull out your driver and let it rip. The large green is bunkered front left and right which also creates a straightforward approach shot. Just do not be short because both bunkers are large and deep. The green has moderate contours. All in all, a solid hole requiring three good shots for birdie.
Hole No. 6 Par 4 429 / 410 / 352 / 336 Yards
This hole features two right-side fairway bunkers and a pair of tall trees at the front left edge of the green. The best play is to feather a tee shot between the short and long bunker to take the trees out of play on the approach. If you fail to do so, you will need to find a running shot in your golf bag for the approach. A wee touch of Scotland in South Texas!
Hole No. 7 Par 5 551 / 518 / 496 / 470 Yards
After playing a gentle draw to fit the fairway, which is guarded by chocolate drop mounds left and bunkers right, the golfer has a decision. This short par 5 is reachable in two shots, but the multi-level and contoured green makes putting a real challenge. The smart play is to lay up and place your approach shot near the pin to eliminate long putts.
This green will generate lots of discussion. It’s only 12-15 yards wide, but 70 yards long, and has dramatic contours throughout! Although only only a single front center bunker protects the green, missing the green left or right results in severe penalties. The most difficult pin position is the far back shelf, which is very small indeed!
Hole No. 8 – Par 3 – 225 / 200 / 160 / 126 Yards
The first of two long difficult par 3s, a great long iron test! A long iron is required, and a fade is suggested to this large green angling right, with the prevailing wind. It also slopes right, so the golfer must judge the contours of the green along with the wind in playing the shot. A long deep finger bunker awaits over played shots to the right and water awaits awry shots. This hole plays like an island green since it is elevated and any tee shot that does not stick on the green spells trouble. A front apron provides the only relief.
Hole No. 9 – Par 4 – 485 / 466 / 434 / 372 Yards
The front-nine finishes with its longest, best-guarded par 4! A true test for any golfer. Two fairway bunkers grace each side of the fairway landing area at varying distances, so the golfer must know both distance and direction on the tee shot. The green features sand hazards left and grass hazards right, as well, so the golfer is best to run the approach right up the narrow fairway approach. Even then, the work is not done on this dogleg right the mid-size green is one of the most contoured on the course, making a closing par difficult.
Hole No. 10 – Par 5 – 535 / 514 / 466 / 406 Yards
The back nine opens with a straightaway, medium length par 5 bordered by wetlands down the entire left side. The tee shot is to a narrow fairway with water coming into play on the right for the long hitters. The second shot offers a choice of routes. Most golfers will lay up short, due to the large center-front bunker protecting the green, while favoring the side of the fairway in which the pin is located. The high banks around the generous green will bounce slightly errant shots back onto the green but do not miss the green by too much.
Hole No. 11 – Par 4 – 326 / 308 / 270 / 249 Yards
A short par 4 with a treacherous fairway and challenging green. The tee shot should ride the wind to the right side of the fairway, especially when the pin is back left on this gentle dogleg right. There are three bunkers on the far left fairway, which are closer to the green then they appear, with the third bunker being located at the front left edge of the green. Beware of the real hazard at the green, the valley of sin, which will catch approach shots and roll them back off the green.
Hole No. 12 – Par 4 – 365 / 348 / 314 / 224 Yards
Another short par 4 with trouble all the way down the gentle dogleg. A lake borders the left side of the fairway from tee to green, guarding the best area to approach the green on this normally downwind hole. A front right greenside bunker tightens the approach to this smaller than normal green. The green is much flatter than most at The Wilderness.
Hole No. 13 – Par 3 – 167 / 144 / 110 / 98 Yards
This par 3 hole features a short iron over a pond with a tree in the island, which can affect tee shots from the back tee. When the pin is left, the tree is in play, calling for a short and accurate iron draw. The large green cants hard left, so golfers can use the contour to feed the ball down to left pin, or as a backstop for a fade when the pin is right.
Hole No. 14 – Par 4 – 387 / 364 / 342 / 268 Yards
The fourteenth usually plays downwind to this sharp right dogleg. A tee shot to the left-side fairway or straight and long is essential to avoid the tree located on the inside corner of the dogleg. A green-front pond can affect the longest tee shots and challenges the approach shot. The small, elevated green has a backstop, which golfers will use in many interesting ways trying to get their approach shot close, and play safely beyond the water and green front bunker. This green is one of the more severely sloping greens on the course.
Hole No. 15 – Par 5 – 572 / 545 / 525 / 491 Yards
The longest hole on the course offers many play options. The tee shot has a center fairway carry pot bunker and two pinching bunkers on the right, encouraging a draw. Be cautious of the water behind the bunkers on the right. The second shot should flirt with the lateral pond to the landing area to open up vision to the semi-blind green when the pin is left. The large well-protected green is a punch bowl, so distance control is not as critical as alignment.
Hole No. 16 – Par 3 – 221 / 204 / 176 / 166 Yards
The second long difficult par 3 features a green bisected by a deep swale. This is one of the few holes you may want to purposely play short of the green when the pin is located in the front. When the pin is located behind the swale, a high five wood or low, driving long iron to run the ball up the slope is the order of the day to get on the right section of the green.
Hole No. 17 – Par 4 – 425 / 410 / 384 / 310 Yards
This par 4 is a great challenge. The tee shot should fade to find the fairway, which has one bunker left and several right, which can affect long hitters. Two bunkers guard the left of the green making the right side approach more favorable. Putting is gentle as a reward for reaching the green in regulation, a good birdie chance.
Hole No. 18 – Par 4 – 461 / 446 / 424 / 404 Yards
The Wilderness finishes with a stern par 4 bordered by a lake along the whole right side. The narrow fairway requires a straight tee shot and it does not get any easier since the second shot is long and demands accuracy. The L shaped green is guarded by the largest bunker on the course to the right at over 100 yards long. Three more bunkers guard the left side green creating a narrow fairway approach. The approach shot will demand a long accurate iron to the generous green. Unlike 17, two putting is not assured here, so this is a fine test of long iron play.


